1. SNAP
- Kajahnan Sivakumar

- Aug 13, 2019
- 5 min read
Updated: Nov 27, 2020
I want to share with you how I automated an inner working process and created a display tool called the SNAP.
In this post I will cover:
The existing process used for daily campaign execution
The problems that this process provided
Goals I set out to achieve
The approach to automating the procedure and building the SNAP tool
Existing Process
Every day there were marketing campaigns that needed to be executed which also needed customers credited with an offer. These campaigns were sent using workflows in Adobe Campaign and went through the following routine:
Execute a workflow to an approval in Adobe Campaign to send an email report to my Outlook to show the breakdown of a campaign.
When the workflow reaches the approval, I'd then manually extract the data as a CSV file with the correct fields e.g. User ID, the country they reside in and so on.
Whilst extracting the data, I would remove the control group so that the data can be analysed for campaign performance.
Afterwards I'd save the file on my desktop with the correct name assigned for a campaign.
Then I will move the file from my desktop to the company's One Drive, in specific folder locations. These folder locations were organised by calendar dates.
Lastly, I would attach the file locations to the email report before sending it to other stakeholders across the business.
This process is also shown below and was required to provide visibility to the Promo Operations (Promo Ops) team with which customers to credit using the csv files.

Problems:
Over time this process posed the following issues:
Data being manually extracted and then moved between systems became tedious and time consuming
Manual interventions in extracting data and assigning it the correct campaign name often led to the chance of incorrect data being shared
The process of extracting data had to be replicated if incorrect data fields were added or the control group was not removed
Lack of transparency between different stakeholders as the Promo Ops team found it difficult to get the correct list
I knew quickly that I had to find an alternative solution which is why I sought this out as a personal project.
Project Goals:
For this project I wanted to achieve the following:
Provide a secure means of transferring data across between different stakeholders
Remove manual interventions in extracting data and sharing it between stakeholders
Minimise the time Data team spent on executing daily campaigns to allow them to work on higher value tasks
Reduce the errors made in crediting customers using csv files, e.g. wrong data being uploaded, incorrect campaign name being assigned to a data file and so on
End Outcome
By breaking down each stage of the process above and tackling it as a solitary problem, I was able to automate the entire data extraction procedure and create a tool that would share its file location, which would later be called the SNAP.
The approach to building the SNAP and the benefits it provided are listed below.
Approach
Stages 1-2: Extracting the data
Initially I experimented with the data extraction tool in Adobe Campaign that would extract files to the SFTP server (The company's data storage platform).
After successful testing, I found that the data fields would be uploaded correctly and by removing the control group in Adobe Campaign, I was able to automate the first two stages of the process as shown below.

Stage 3: Automating the campaign name
After testing the data extraction, I researched online on Adobe Campaign forums for formulas to automate campaign names in Adobe Campaign, where I found the following:
<%= instance.label %>
<%= formatDate(new Date(), "%2D_%2M_%4Y") %>
The orange formula would automatically populate the name of a workflow label to the file extracted, whilst the blue formula provides the date at which a workflow was executed.
I would then combine both formulas in Adobe to create this:
<%= instance.label %>_<%= formatDate(new Date(), "%2D_%2M_%4Y") %>.csv

By combining the two formulas, I would automate the name of the campaign file and new files would be created on each day a workflow is executed. i.e. if a campaign was called: 10 Elephants, this tool would create the following file names for these dates:
24th May : 10 Elephants_24_05_2019
25th May: 10 Elephants_25_05_2019
This provides a clear tracking log of data used each time we send a campaign, which aids us and the customer service teams in resolving customer inquiries.
Stage 4: Transition from OneDrive to SFTP
Problem:
So far, the first 3 stages of the manual crediting process have been successfully automated. However, I still needed to move the CSV files into OneDrive folders and share the location URL in a email report to Promo Ops. I needed to find an easier way to do this, but given there was no direct extraction link between Adobe Campaign and OneDrive, it became a problem difficult to overcome.
Solution: This led me liaising with Promo Ops to see what could be changed from their side to make things easier. I found that they also use SFTP and explored the option to remove OneDrive as a data storage facility.
Using the file transfer tool, I learnt that data could be moved to specific locations on SFTP. The problem was though, it became difficult to find the correct list for users given files were being uploaded to the server daily. I understood soon that to make the transition successful, I needed to provide a clear folder path.
But before I replicated the date format folder structure we had in OneDrive, I had an idea of Adobe Campaign automatically extracting the CSV files in specific date folders.
The idea would be that if a workflow was executed on the the 25th of May 2019, the file would be automatically uploaded in SFTP in the folder path: 2019 > 05 > 25.
By liaising with a senior developer and explaining how the idea would work, we created a JavaScript code to implement this:
<%= formatDate(new Date(), "%4Y") %>/<%= formatDate(new Date(), "%2M") %>/<%= formatDate(new Date(), "%2D") %>
Through out a month, I used sample data to check the validity of the code and to see whether data files were being placed in the correct locations. After successful testing, I implemented the new folder structure for the rest of the calendar year and moved to automating stage 5.
Stage 5: Building the SNAP:
Problem:
The only problem now was having to manually add the file location to our reporting tool before sharing it to stakeholders. As seen below, the reporting tool we'd share is an email that would be sent to us from the Adobe workflow to show the targeting breakdown for a specific campaign.
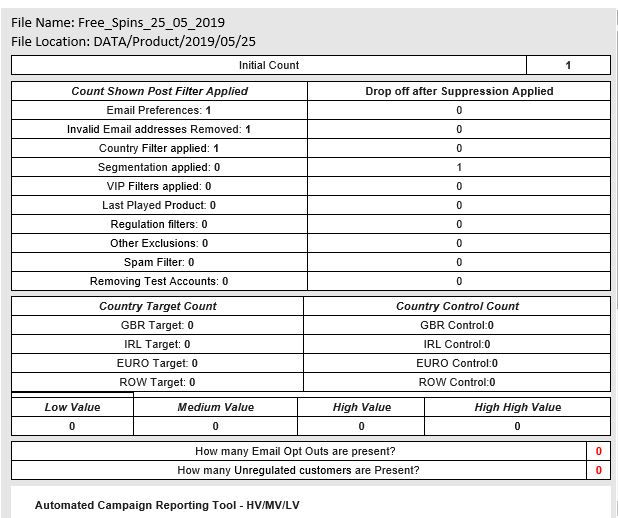
Solution:
Given that the reporting tool was amendable through HTML, I thought that building an integrated display feature that would automatically show the CSV file name and its location on SFTP would be the last piece to the puzzle.
I experimented with the source code of a template report and after several tests, I was able to successfully integrate the code from stages 3 and 4.
The initial design to show the file name and its folder path would look as follows:
When added to the reporting tool it would look like this:
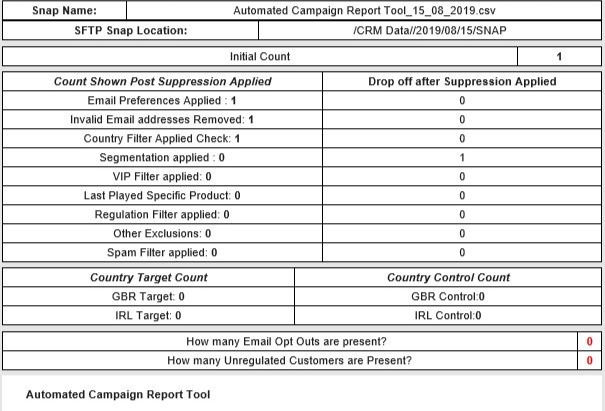
After showing this to other members of the team, they suggested to make it clearer in the report. After working through different designs using HTML and CSS, I then modified it to this:

After finalising the design of the SNAP, I provided technical documentation on our Confluence server and went through with the relevant stakeholders of how the SNAP would benefit them.
SNAP Optimisations:
Once methods of crediting customers diversified in Adobe Campaign, I made improvements to the SNAP to take into account these changes. The modifications below showed this by providing the number of customers credited and the method that was used.

Benefits:
By automating this procedure, I accomplished the following:
Reduced the number of errors in transferring data between stakeholders
Faster execution time of campaigns, providing the Data team with more resource to work on higher value tasks
Improvement in stakeholder relationships between Data and Promo Ops
Expansion of our workflow capabilities by enabling us to move to a new multi channel workflow model which you can read in this post
Overall, the project was hugely successful and the lessons learnt have been used for other optimisation projects.


Comments